Tuesday, August 28, 2018

AX 2012 Importing Purchase Order Using DIXF


In this post we will illustrate how to import purchase orders through data import export framework. we will use one excel file which contain purchase order header in first sheet and purchase order details in another sheet.


to import the purchase order please do the following steps:

1-   Go to Data import export framework --> Setup --> Data import / export framework Parameters.


2-       Click browse to select shared working directory then click Validate button then close the form.


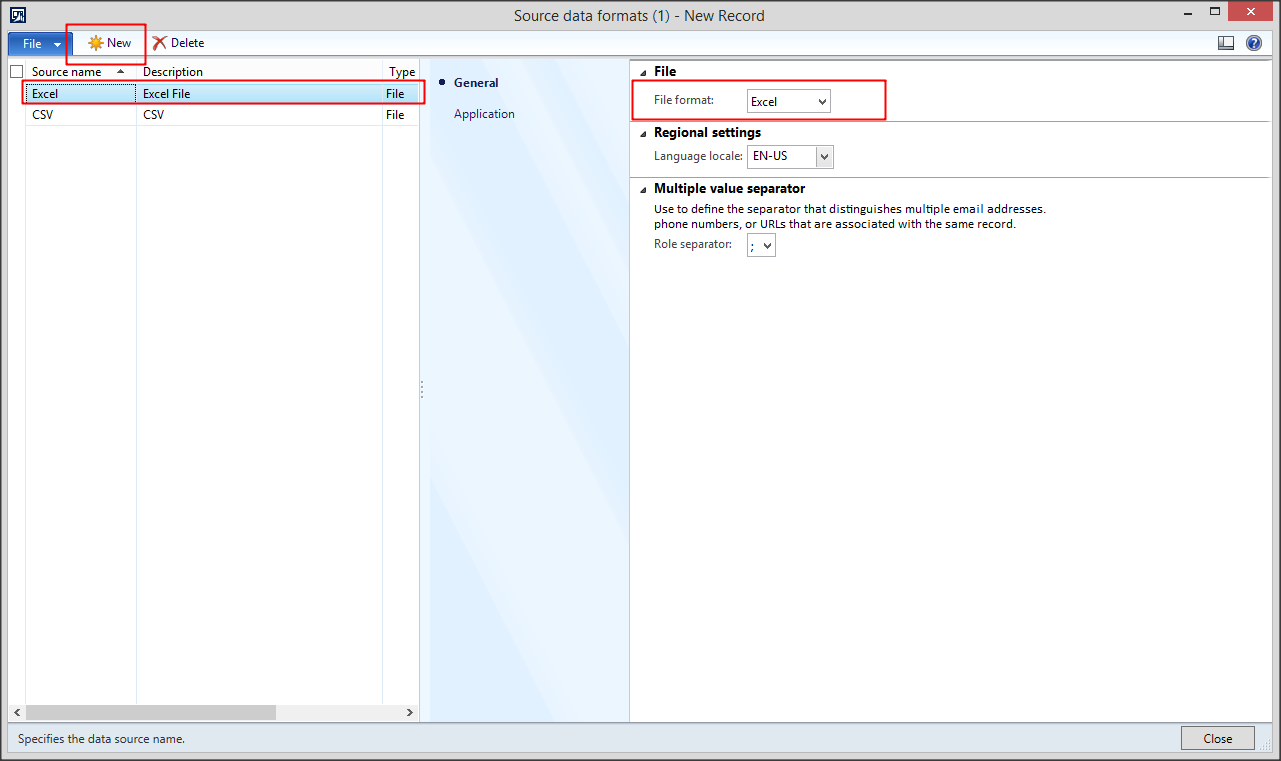
3- Go to Data import export framework --> Setup --> Source Data format, Create new source name and make sure to choose File in the Type field then select the file format in my example i will use excel , you can use either CSV , procedures are all the same. 


4- Go to Data import export framework --> Common --> Processing Group, Create New Group then Click the Entities Button.


5- in the entities form select the Purchase Order Header Entity,select Excel in the Source data format, then Click the generate source file button.


6- In the wizard click next then Make sure to select the following fields:

CurrencyCode
InvoiceAccount
LanguageId
OrderAccount
PurchId
VendGroup
PurchName
PurchaseType
PurchStatus
DocumentState
DeliveryDate

Then click Generate sample file.


7- when the excel file is opened, change the sheet name to POH.


8- Select the second sheet in the Excel, Change the sheet name to POL then add the following field names:


CurrencyCode

VendAccount
VendGroup
PurchId
ShippingDateConfirmed
LineNumber
ItemId
Name
PurchQty
PurchUnit
PurchPrice
InventSiteId
InventLocationId
PurchaseType


09- Go back to POH sheet, enter the purchase order header details.


10- select the POL sheet, Enter the purchase order lines details. in this example i will add two lines


11- when you finish make sure to save the file in the shared folder that we specified in step 2.


12- Go back to the processing group --> entities---> Select the "Purchase order header" entity, specify  the Excel file path then from the sheet lookup select POH$, click generate source mapping button.


13- Click New, Select Purchase order line entity, select Excel from source,specify the Excel file path then from the sheet lookup select POL$, click generate source mapping button then close. 


14- To preview the Purchase header details select purchase order header entity then Click the Preview source file button.


15- To preview the Purchase lines details select purchase order line entity then Click the Preview source file button. 


16- Close the form


16.1- In the processing group select the group name then click the Get staging data button to copy the file data to staging table.


17- Click OK to create job.


18- Click Run in the staging data execution form.


19- Click OK. 


20- The records will be inserted in the staging.


21- In the processing group select the group name then click Copy Data to target button.


22- Select the Job ID that we created in step 17 then click OK.


23- Click Run to import data.


24- Click OK.


25- The data will be written to target.


26- To view the imported purchase order go to the all purchase order list form, you will found that the purchase order was imported successfully.


Wednesday, August 22, 2018

Replacement key in AX 2012

What is replacement key??

A replacement key is an alternate key that the system can display on forms instead of a meaningless numeric primary key value. Each table can have a maximum of one replacement key.

The replacement key is chosen by setting the ReplacementKey property on the table. The drop-down list offers every alternate key as an available value.


The drop-down list contains every index that has its AlternateKey property set to Yes.

You might change the default blank value to an index whose field values within each record provide a name or other moniker that is meaningful to people. If a ReplacementKey is chosen, its fields can appear on forms to helpfully identify each record.

The ReplacementKey should be a set of fields that represent the natural key.


Now let’s look at it in AX 2012, how we can create this key and how does it look.

Firstly am going to create a simple table called “EmployeeTable” which contains 3 fields emplId, Name and DOB (dateofbirth).

And now going to create index on this table where “AllowDuplicate” property should be set as ‘NO’ and alternate key property as ‘YES’ .As shown below:


Once the creation of index is done then we can easily assign the replacement key to this table as shown here in the below image.


Now creating another table called “EmployeeTransactions” which contains 2 fields TotalAmountCharged and TotalHourWorked.

In order to give relation with EmployeeTable, creating foreign key relations and as soon as we do that automatically new field (EmployeeTable) got added in our “EmployeeTransactions” table. As shown in below image:


Now, I can say that relation exist between the two tables and relation is RecId field of employeetable to that of newly created employeeTable field (Int64 – datatype).

NOTE: You can also achieve this relations using EDT.


Now let’s create some line in to these tables and check how and what it stores in to employeetable field in ‘employeetransaction’ table.

As we have seen from backend, table stores the INT64 field i.e., recId of related ‘employeetble’ record.


Since form is the artifact which is user oriented (Client interface). Now let’s create a form and check how it appears there. So am just creating a simple form which consist of these two table as datasource and using the joinsource property to join them. Form structure looks something like this:


So basically, header and line part in form represents “employeetable”&” employeetransaction”. Here in header part details can be filled up & emplid can be easily accessed and if you look at the line level there is a field called reference which I dragged from transaction datasource > emloyeetable field.  For reference, just look at the form image above.

Now here comes the magic J as soon as you create & save the record in header then line level reference gets filled up with related emplid field. But if you look at the backend in tables it would be stored as recid.

So I can say that Alternate key allows the system to display significant value on forms instead of a meaningless numeric primary key value. Each table can have a maximum of one replacement key


How to use Event Handler in Microsoft Dynamics AX 2012:


Hi,
Microsoft incorporated lot of beautiful new features in Dynamics AX 2012 and one of them is Event Handler. It’s a very nice feature of Dynamics AX 2012 which allows you trigger an event after or before an activity.
So today am going to tell you about these features:
In Microsoft Dynamics AX 2012 how to handle event on different methods / occurrences.
In Microsoft Dynamics AX 2012 how to implement or apply pre or post event handler.
How to develop an event handler step by step in Microsoft Dynamics AX 2012.
What is new in Microsoft Dynamics AX 2012 from programming point of view?
X++ Event handling in Dynamics AX 2012.
You should invoke events over using pre or post events on methods.
Pre-Event Handlers and Post-Event Handlers
An event handler can reside underneath a method node can run either before or after the method runs. You can use CalledWhen property on the event handler node. The CalledWhen property has two values:
• Pre – The event handler runs before the method starts.
• Post – The event handler runs after the method ends.
A new class the XppPrePostArgs Parameter is being used by event handlers.
A pre-method event handler that has only an XppPrePostArgs parameter can inspect and change the values of the parameters.
Similarly a post-method event handler that has only an XppPrePostArgs parameter can inspect and change the return value from the method.
When an XppPrePostArgs object is used, the values of the parameters and the return type can be changed by the event handler. The values can be changed even if the parameters and return type are value types, such as an integer or string. If a parameter or a return type is a reference to an object, the event handler can call methods on the object and could change the state of the object.
Event handlers can run only on the same tier as the publisher class of the delegate runs on. For instance, if the publisher class has its RunOn property set to Server, to declare a method with client keyword and call a subscribed event handler method is not allowed.
You can use X++ event as well as .Net made managed code event. You can define it at Event handler proper called EventHandlerType.
How to use event handlers in Microsoft Dynamics AX 2012 step by step:
1) Open your new developer work space and go to AOT then classes node.
2) Right click on Classes node and click on New Class as shown below.
                                                 1
3) By default system will give a name to it. Here in my case it’s Class1. Right click on newly created class and click on Rename shown below.
24) After clicking Rename, give a name called CustTableEventHandler to it. Here I am going to develop an event to be applied on CustTable so that is the reason why I decided this name (CustTableEventHandler). After renaming this class, it looks as shown below.
35) Right click on class CustTableEventHandler then New then Pre- or post-event handler as shown below.
4
6) Once you click on this, system gives you a method as shown below.
57) Customize the method as shown below.
68) Here args is providing current record to custTable instance and info is displaying the current customer account. The code snippet is below.
public static void custCreateInfo(XppPrePostArgs _args)
{
CustTable custTable;
custTable = _args.getThis();
info(strFmt(“Customer account %1 has been created”, custTable.AccountNum));
}
This method I support to call from insert method of CustTable with type post event. It means that once insertion is done to CustTable, system will display recently inserted customer account number. It depends on your business requirement what logic you want to apply here. So here you can develop your required business logic or invoke pre built logic.
9) Go to Tables node in AOT then find out CustTable.
710) Go to insert method of CustTable and right click on it then click on New Event Handler Subscription as shown below.
811) After clicking you will get a new Event handler shown below.
912) Rename the event handler to custCreateInfo and set the property as shown below.
1013) Now save your work.
14) Go to Customer form and create a new customer. Here I created a new customer account called “Test-000001”.
1115) Once this customer is created system will give your infolog as shown below.
12Hope this will help you to understand the event handler in Microsoft Dynamics AX 2012